
SSL Certificate Installation: Easy Guide
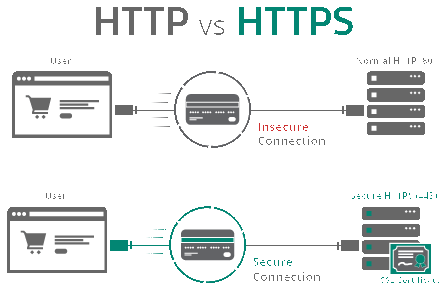
When it comes to securing your website and protecting your users’ sensitive information, installing an SSL certificate is a crucial step. An SSL certificate encrypts data transmitted between your website and your visitors, ensuring that it remains private and secure.
What is an SSL Certificate?
SSL stands for Secure Socket Layer, and an SSL certificate is a digital certificate that authenticates the identity of a website and encrypts data sent between the website and its visitors. This encryption protects sensitive information such as credit card details, login credentials, and personal information from being intercepted by hackers.
Types of SSL Certificates
There are several types of SSL certificates available, including:
DV (Domain Validated) SSL Certificates: These certificates only verify the ownership of the domain name.
OV (Organization Validated) SSL Certificates: These certificates verify the ownership of the domain name and the organization’s identity.
EV (Extended Validation) SSL Certificates: These certificates provide the highest level of validation and display a green address bar in the browser, indicating a secure connection.
How to Install an SSL Certificate
Here is a step-by-step guide to installing an SSL certificate on your website:
1. Purchase an SSL Certificate
First, you need to purchase an SSL certificate from a trusted Certificate Authority (CA). There are many CAs to choose from, such as Comodo, Symantec, and Let’s Encrypt. Make sure to choose the type of SSL certificate that best suits your website’s needs.
2. Generate a CSR
Next, you will need to generate a Certificate Signing Request (CSR) from your web server. The CSR contains information such as your domain name, organization name, and location. This information is used by the CA to verify your identity before issuing the SSL certificate.
3. Submit the CSR
Once you have generated the CSR, submit it to the CA along with any other required documentation. The CA will then verify your identity and issue the SSL certificate to you.
4. Install the SSL Certificate
Finally, you will need to install the SSL certificate on your web server. The exact process may vary depending on your web server software, but most CAs provide detailed instructions on how to install the certificate.
Benefits of SSL Certificate Installation
There are several benefits to installing an SSL certificate on your website:
Improved Security: An SSL certificate encrypts data transmitted between your website and your visitors, protecting sensitive information from being intercepted by hackers.
Trust and Credibility: Websites with SSL certificates display a padlock icon in the browser, indicating a secure connection. This instills trust in your visitors and improves your website’s credibility.
SEO Benefits: Google gives a ranking boost to websites with SSL certificates, so installing an SSL certificate can improve your website’s search engine rankings.
Conclusion
Installing an SSL certificate is essential for securing your website and protecting your users’ sensitive information. By following this easy guide, you can ensure that your website is secure and trusted by your visitors. Remember to choose the right type of SSL certificate for your website’s needs and follow the installation instructions provided by the CA. Enjoy the benefits of improved security, trust, and SEO rankings with an SSL certificate installed on your website.