Step-by-Step Guide to Connect Domain to Hosting
Connecting your domain to your hosting is a crucial step in launching your website. This process can seem daunting, especially for those who are new to the world of web development. However, with the right guidance, it can be a straightforward and seamless process. In this article, we will provide you with a step-by-step guide on how to connect your domain to your hosting.
Step 1: Choose a Reliable Hosting Provider
Before you can connect your domain to your hosting, you need to have a hosting provider. It is essential to choose a reliable provider that offers good support and uptime. Some popular hosting providers include Bluehost, SiteGround, and HostGator. Once you have chosen a hosting provider, you will need to sign up for a hosting plan and set up your account.
Step 2: Retrieve Your Name Servers
After signing up for a hosting plan, you will need to retrieve your hosting provider’s name servers. Name servers are a set of DNS (Domain Name System) servers that are responsible for translating domain names into IP addresses. You can usually find your hosting provider’s name servers in the welcome email that you received after signing up for a hosting plan.
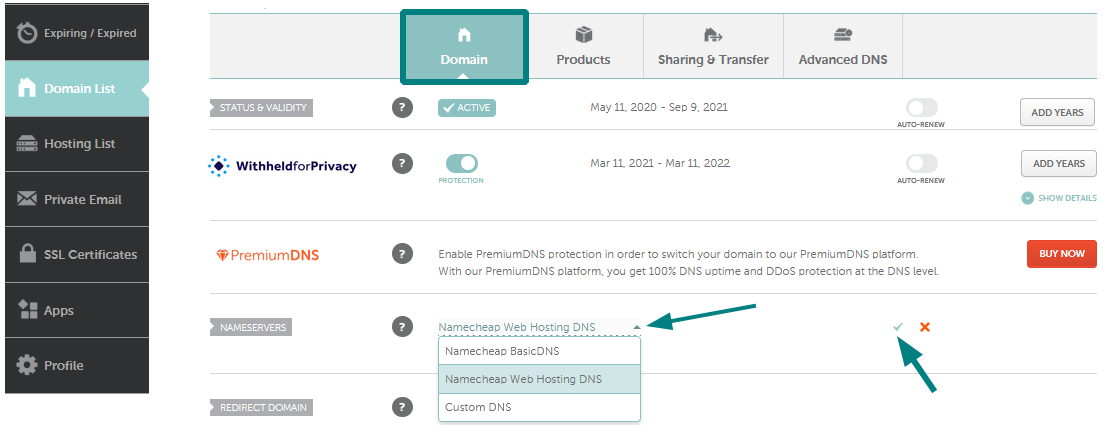
Step 3: Log in to Your Domain Registrar
Next, you will need to log in to your domain registrar. Your domain registrar is the company where you purchased your domain name. Popular domain registrars include GoDaddy, Namecheap, and Google Domains. Once you have logged in to your domain registrar, you will need to find the option to manage your domain’s DNS settings.
Step 4: Update Your Name Servers
In the DNS management section of your domain registrar, you will see an option to update your name servers. You will need to replace the default name servers with the name servers provided by your hosting provider. This process may take some time to propagate, so be patient. Once the changes have propagated, your domain will be connected to your hosting.
Step 5: Test Your Connection
After updating your name servers, you should test your connection to ensure that your domain is successfully connected to your hosting. You can do this by typing your domain name into a web browser and seeing if your website loads. If your website loads successfully, congratulations, your domain is now connected to your hosting!
Additional Tips
Make sure to keep a backup of your DNS settings before making any changes.
Double-check the spelling of your name servers to avoid any errors.
If you encounter any issues, contact your hosting provider’s support team for assistance.
Conclusion
Connecting your domain to your hosting is a crucial step in launching your website. By following the steps outlined in this guide, you can seamlessly connect your domain to your hosting and start building your online presence. Remember to choose a reliable hosting provider, retrieve your name servers, update your DNS settings, test your connection, and seek assistance if needed. With this guide, you will be well on your way to creating a successful website.